

The players averaging the most mid-range attempts in the 2026 NBA playoffs are converting at rates between 44% and 57%. Those are players with repeatable jump shot mechanics.
Yet a jump shot looks simple until the timing gets messy. Some players jump first and shoot late. Others release before their legs help. Some float, fade, or land differently every rep.
The result is a shot that feels different every time you take it, which means the mechanics you built in practice do not show up in games.
This guide breaks down the timing chain that holds a jump shot together and shows you exactly where yours is breaking down.
Working on Your Jumper at Home? GRIND Helps You Repeat More Reps Without Chasing Rebounds →
Quick Answer: How Do You Shoot a Jump Shot Correctly?
To shoot a jump shot correctly:
-
Start with balanced feet
-
Bend your knees and load your legs
-
Bring the ball into a consistent shot pocket
-
Keep your eyes on one target on the rim
-
Begin lifting the ball as your body rises
-
Jump mostly straight up
-
Release near the top of your jump
-
Snap your wrist for backspin
-
Hold your follow-through
-
Land balanced, close to where you jumped
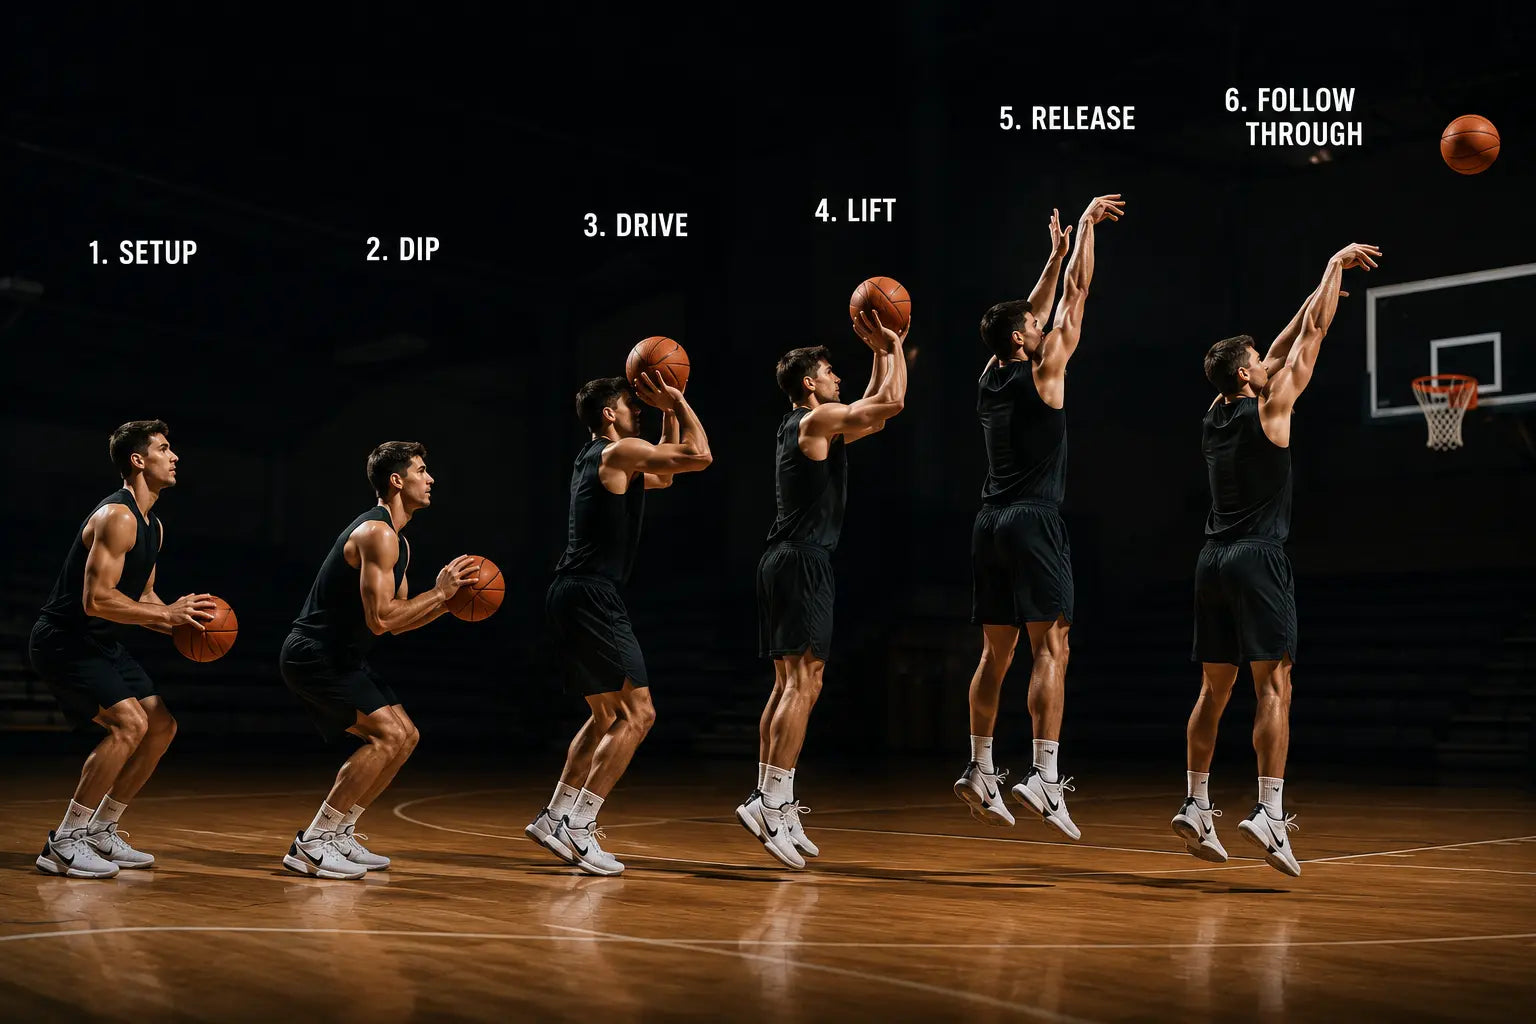
The goal is to jump the same way and release at the same point every time.
What Is a Jump Shot in Basketball?
A jump shot is a shot taken while the player is in the air. The player loads through the legs, jumps, lifts the ball, releases before coming down, and lands after the shot. It is the most common shot in basketball above the beginner level because the elevation makes it harder to contest and the release point is higher than a set shot.
Why Players Use Jump Shots
Elevation creates separation from a defender. A shot released at seven feet off the ground is harder to block than one released at five. The jump shot also works off the catch and off the dribble, which makes it the foundation of mid-range and perimeter scoring.
Why Jump Shots Are Harder Than Set Shots
The jump adds variables the set shot does not have: jump height, release timing, landing balance, footwork before the shot, body drift, and fatigue. Any one of those can change the shot without the player noticing. That is why timing is the central skill, not just the mechanics of the arm.
Set Shot vs Jump Shot: What Is the Difference?
A set shot is taken with the feet planted or with very little lift. A jump shot is taken while the player is airborne. Set shots require less energy and are easier to control, which makes them useful for free throws, close-range form work, and beginners building their shot from scratch.
|
Feature |
Set shot |
Jump shot |
|
Feet |
Stay planted or barely leave the floor |
Leave the floor |
|
Release |
Usually lower and simpler |
Higher release point |
|
Energy cost |
Lower |
Higher |
|
Best for |
Free throws, beginners, open shots |
Mid-range, contested shots, game-speed scoring |
|
Timing difficulty |
Easier |
Harder |
|
Defensive advantage |
Easier to contest |
Harder to block |
Which Should Beginners Learn First?
Beginners should learn close-range set-shot mechanics first. Once the player can shoot with balance, hand control, and a clean follow-through, they add jump-shot timing on top of that foundation. Trying to learn both at once usually means learning neither well.
The Right Form for a Basketball Jump Shot
Start Balanced Before the Jump
Feet about shoulder-width apart, shooting foot slightly forward if that is natural, knees bent, weight centered. CJ McCollum explained that no matter how much momentum is going into the shot, the center of mass stays directly under the ball so he goes straight up and straight down. That alignment starts before the feet leave the floor.
Use a Consistent Shot Pocket
The shot pocket matters more on a jump shot than a set shot because the ball and body need to rise together. If the pocket changes from rep to rep, the timing chain breaks at the start. The shot should begin from the same place every time whether the player is tired, moving, or shooting under pressure.
Larry Bird found the seams on the ball automatically on every catch because the hand placement had to be consistent before anything else could be. The same principle applies to the pocket. Automatic, repeatable, same starting point.
Keep the Ball Moving With Your Body
The ball should lift as the body rises. Players who jump first and bring the ball up late end up rushing the release or shooting on the way down. The lift should be one connected motion. Steph Curry's form breakdown shows no pause between the legs loading and the ball reaching the set point. Everything moves together.
Jump Straight Up
Drifting backward, sideways, or lunging forward on a normal form rep creates a different shot every time. The jump should be controlled and vertical. CJ McCollum described how once there is too much lean, the follow-through and the wrist have to compensate for the body's position, which adds random variables to what should be a clean repeatable motion.
Release Near the Top of the Jump
Most players should release near the top of the jump, just before the body starts falling. Releasing too early means the legs contributed nothing. Releasing too late means the arms are doing extra work against gravity. The window at the top of the jump is where the energy from the legs and the arm release work together most efficiently.
Finish With a High Follow-Through
Full arm extension, wrist snap, backspin, fingers toward the rim, finish held until the ball hits the rim or net. Larry Bird's instruction was to extend the arm and wrist as if they were going right through the basket. Dropping the hand early cuts the release short and usually flattens the arc.
Use GRIND to Repeat Your Jump-Shot Timing From Multiple Spots →
How to Time Your Jump Shot Release
This is where most players have the biggest gap between what they think they are doing and what is happening.
The Ideal Timing Sequence
|
Step |
Action |
|
1 |
Feet load |
|
2 |
Ball enters shot pocket |
|
3 |
Knees bend |
|
4 |
Ball begins to rise |
|
5 |
Legs extend, body lifts |
|
6 |
Ball reaches release position |
|
7 |
Wrist snaps at top of jump |
|
8 |
Land balanced |
Every step feeds the next. If one step is late, the rest of the chain adjusts and the shot changes.
Releasing Too Early
Signs: The ball leaves before the jump contributes power, the release point is low, the shot feels like a throw rather than a natural motion.
Fix: Slow the lift and let the legs initiate the shot before the arms take over.
Releasing Too Late
Signs: The shot falls short, the player releases on the way down, the arms feel strained, the shot arc gets flat late in workouts.
Fix: Start the ball lifting earlier so the release happens before gravity starts pulling the body down.
Jumping Too High Every Rep
A jump shot is not a vertical leap test. Jumping at maximum height every rep makes timing harder to repeat and burns the legs faster. The best jump height is the one the player can do the same way on rep 1 and rep 200.
JJ Redick described the importance of push-off force through the ground as one of his primary shooting cues. We’re not talking maximum elevation, but consistent force into the floor that produces a repeatable launch.
Jumping Differently Every Rep
A different jump creates a different shot. Players who change their jump height based on distance, fatigue, or pressure are changing their timing chain on every rep.
The footwork, jump, and pocket should stay the same whether the player is shooting a wide-open mid-range or a contested three in the fourth quarter.
Why Is My Jump Shot Inconsistent?
|
Problem |
What it looks like |
Likely cause |
Fix |
|
Shot short |
Front rim, tired arms |
Releasing late or not using legs |
Release before falling, load legs |
|
Shot long |
Hard back rim |
Too much arm force, rushed jump |
Smooth timing, reduce tension |
|
Left or right misses |
Ball drifts sideways |
Body drift, guide hand, elbow path |
Land balanced, quiet guide hand |
|
Flat shot |
Low arc |
Late release or low finish |
Release higher, finish up |
|
Different shot every rep |
No repeat rhythm |
Footwork or pocket changes |
Same pocket, same landing |
|
Slow release |
Defender contests easily |
Ball starts too low or too late |
Start the lift earlier |
|
Fade every shot |
Falling backward |
Poor balance or shooting too far |
Move closer, freeze landing |
Common Jump Shot Mistakes and How to Fix Them
Jumping Before the Ball Moves
The legs and the ball lift should start together. If the player jumps and then raises the ball, the timing chain is broken from the start and the release happens on the way down.
Releasing on the Way Down
Release near the top of the jump before gravity takes over. A shot released on the way down is fighting against the body's momentum rather than working with it.
Jumping Too High on Every Shot
Use a controlled repeatable jump. Save maximum elevation for contested game shots where separation is necessary. In practice, the most useful jump is the one that looks the same every time.
Drifting Backward
Move closer, freeze the landing, and make sure the feet are balanced before takeoff. Normal form reps should not have a fade. If a player is consistently drifting, they are either shooting from too far away or compensating for something in the footwork before the shot.
Changing the Shot Pocket
Use a pocket-pause drill: catch the ball, bring it to the shot pocket, pause briefly, then shoot. If the pocket changes based on where the pass came from or how tired the player is, the timing chain starts from a different place every rep.
Guide-Hand Push
The guide hand stabilizes the ball and gets out of the way. If it pushes at release, the ball picks up side spin and drifts left or right. The guide-hand freeze drill isolates this specifically: after release, the guide hand should face the side, not turn toward the rim.
Dropping the Follow-Through Early
Hold the finish until the ball hits the rim or net. Dropping the hand immediately to watch the shot often means the wrist snap was cut short, which flattens the arc and reduces backspin.
Stop Chasing Misses and Stay Locked Into Your Shooting Rhythm →
Best Drills to Improve Your Jump Shot
One-Motion Timing Drill
Start close. Bend the knees as the ball enters the pocket. Lift the ball as the body rises. Release near the top. Hold the follow-through. The drill trains the legs, ball lift, and release to happen as one connected motion rather than three separate pieces.
No-Drift Landing Drill
Shoot from mid-range and land close to the takeoff spot. Hold the landing for two seconds. If the player drifts, the rep does not count. This drill is unglamorous and players resist it, but it catches the most common cause of arc and direction inconsistency before any other adjustment is needed.
Pocket-to-Release Drill
Catch or self-toss the ball. Bring it to the same shot pocket. Rise and shoot. Track whether the ball starts from the same place on every rep. The drill builds the habit of a consistent starting position, which is the foundation of a repeatable timing chain.
Top-of-Jump Release Drill
Shoot close jump shots and say "now" or "up" at the moment of release. The goal is for the release to happen before the body starts falling. A partner or coach watches whether the ball leaves at the top rather than on the way down.
Catch-and-Shoot Jump Shot Drill
Catch from a passer or machine. Step into the shot. Load, rise, release. Land balanced. Repeat from three to five spots. The drill transfers mechanics from controlled form work into the footwork and timing of a real game catch. Start from spots where the form is already consistent before adding new positions.
GRIND Jump Shot Rhythm Drill
Pick one cue per session: same pocket, release near the top, or land balanced. Shoot 10 to 20 reps from each of the GRIND Machine's 9 spots. Track makes and miss direction. Keep the same jump height and release timing across all spots.
The machine returns makes and misses automatically so the player stays in the timing loop rather than breaking rhythm to chase rebounds. For a full breakdown of how to build this into a structured solo session, the basketball shooting drills guide covers session structure in detail.
How Many Jump Shots Should You Take in Practice?
Jump shots require more timing precision than set shots, which means quality controls volume more than any other shot type.
|
Player level |
Focus |
Suggested volume |
|
Beginner |
Close form and set-shot mechanics |
25–50 jump-shot attempts |
|
Intermediate |
Mid-range timing and landing |
75–150 attempts |
|
Competitive |
Catch-and-shoot and off-dribble reps |
150–300+ attempts |
|
Serious solo shooter |
Multi-spot rhythm work |
300+ quality reps |
Volume only helps if the timing stays consistent. If the player starts releasing late, drifting, or pushing, move closer or rest before continuing. Bad reps at volume build bad habits faster than no reps at all.
How GRIND Helps Players Build a Consistent Jump Shot
Jump-shot timing depends on rhythm between reps. Chasing the ball after every miss breaks that rhythm loop. The GRIND Machine catches makes and misses automatically and returns the ball to 9 programmed spots, which keeps the player in the timing sequence rather than resetting after every shot.
That consistency also makes catch-and-shoot practice more useful. When the ball arrives at the same spot and height on every return, the player practices the full sequence on every rep: catch, load, rise, release, land. Remove the rebound and you remove the most common reason solo jump-shot sessions fall apart.
Build a Smoother Jump Shot With More Reps and Less Chasing. Explore GRIND →
FAQ
How do I shoot a perfect jump shot?
To shoot a perfect jump shot, start balanced, load your legs, bring the ball into a consistent shot pocket, rise straight up, lift the ball with your body, release near the top of your jump, snap your wrist, hold your follow-through, and land balanced. The most important element is timing: the legs, ball lift, and release should happen as one connected motion.
What is the right form for a jump shot in basketball?
The right form for a jump shot includes balanced feet, a consistent shot pocket, smooth leg drive, straight vertical lift, a quiet guide hand, high release near the top of the jump, wrist snap with backspin, and a controlled balanced landing.
How do I time my jump shot release?
To time your jump shot release correctly, start lifting the ball as your body rises and release near the top of your jump before you start coming down. If you release too late the shot falls short. If you release too early the jump contributes nothing to the power.
Why is my jump shot inconsistent?
A jump shot is inconsistent most often because the footwork, shot pocket, jump height, release timing, or landing changes from rep to rep. Fix one variable at a time starting from close range, and do not add distance until the timing holds consistently.
What is the difference between a set shot and a jump shot?
A set shot is taken with the feet planted or with very little lift, making it lower energy and easier to control. A jump shot is taken while airborne, giving a higher release point that is harder for a defender to contest.
Should I release at the top of my jump?
Most players should release near the top of the jump, just before they start falling. Releasing too early wastes the elevation and leg power. Releasing too late forces the arms to work against gravity.
Why does my jump shot fall short?
A jump shot falls short most often when the player releases on the way down, does not use enough leg drive, shoots from too far away, or has a flat follow-through. Move closer, load the legs, and finish higher before adjusting anything else.
Can GRIND help me improve my jump shot?
The GRIND Machine helps players improve their jump shot by giving them more repeated reps without chasing rebounds, which keeps the timing loop intact across a full session. It works best when the player has a specific cue and uses the machine to repeat that cue consistently from multiple spots.
Share:
How to Shoot 3 Pointers: Why Your Shot Falls Short and How to Fix It